Software Integrations
MJ4D smoothly integrates with other AEC software to complete complex projects.
MJ4D Software Integrations
MJ4D integrations simplify your experience when working with popular CAD software such as MicroStation and AutoCAD. These integrations allow you to open the MJ4D project in your web browser at a location selected in another program, providing a seamless workflow when using MJ4D in conjunction with other software.
Additionally, you can effortlessly export MJ4D Panoramas to a KML file for viewing and syncing panoramic photo locations between an MJ4D project and other projects in programs such as ArcGIS and Google Earth.
Downloading MJ4D Integration Files
Access all MJ4D integration files within either the Dashboard or the Navbar in a MJ4D Project.
On the Dashboard:
- First locate the Project in the Projects Table.
- Next, select the Integrations Button which will open a window with buttons to download files to connect with external software (AutoCAD, MicroStation, etc).

Within your Project:
Find the Integrations Button on the MJ4D Viewer Navbar:

Selecting either of these buttons will open the Integrations Window:
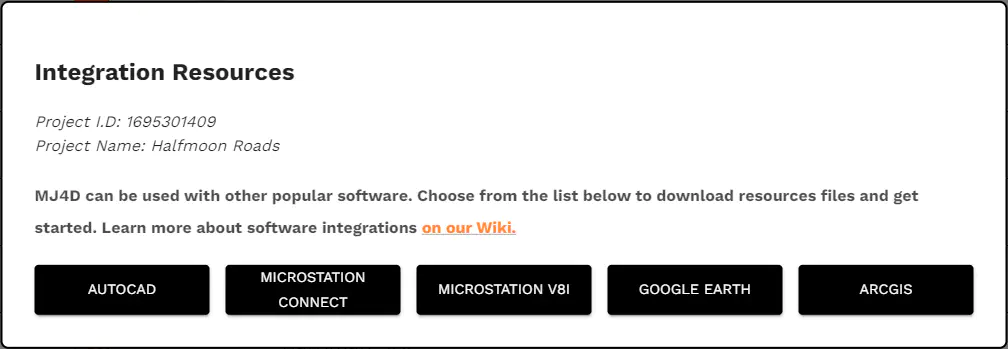
Each button will download a zipped folder with the required files for the specific integration. Software specific files are as follows:
AutoCAD: autocad_integrations_(Project ID).zip
- mj4d_dyn.lsp
- mj4d_config.txt
MicroStation Connect: microstation_connect_integrations_(Project ID).zip
- mj4dConnect_dyn.mvba
- mj4d_config.txt
MicroStation V8i: microstation_v8i_integrations_(Project ID).zip
- mj4dV8i_dyn.mvba
- mj4d_config.txt
Google Earth: kml_googleEarth_integrations_(Project ID).zip
- integrations_(Project ID).kml
ArcGIS: kml_arcGIS_integrations_(Project ID).zip
- integrations_(Project ID).kml
Additionally, each folder will include a readme file that links to this help wiki.
AutoCAD
To integrate MJ4D with AutoCAD use the mj4d_dyn.lsp file downloaded from your project.
In AutoCAD:
Type and run the
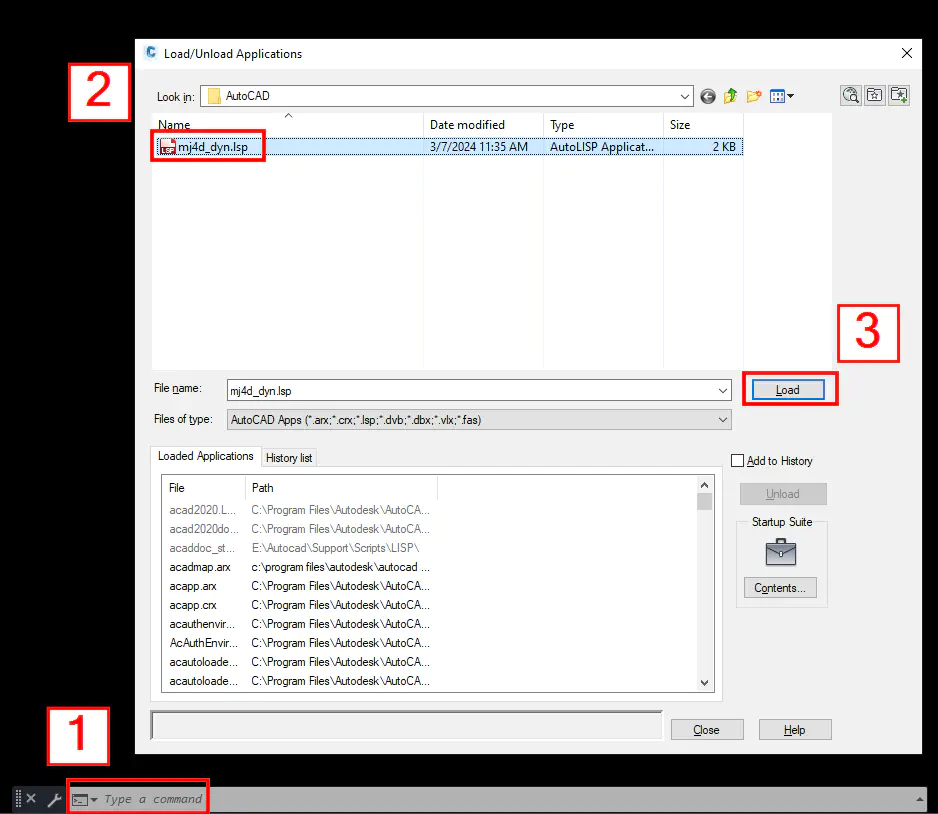
APPLOADcommand to open the Load/Unload Applications dialog window [1].In Load/Unload Applications, navigate to and select the mj4d_dyn.lsp file that was downloaded from your project [2]. Click Load [3].
Note: the mj4d_config.txt file from the integrations download needs to be in the same folder as the .DWG file being used in AutoCAD.
- With the mj4d_dyn.lsp loaded, you now have the
MJ4Dcommand available. To use it:
- Type and run the
MJ4Dcommand to activate the MJ4D tool. - Click a location in your drawing.
- The MJ4D project will launch in your default browser at the panoramic photo location closest to where you clicked.

Automatically load with the Startup Suite:
- To load the MJ4D command on startup, add to the Startup Suite.
- Follow steps 1 and 2 above to open the Load/Unload Applications dialog window.
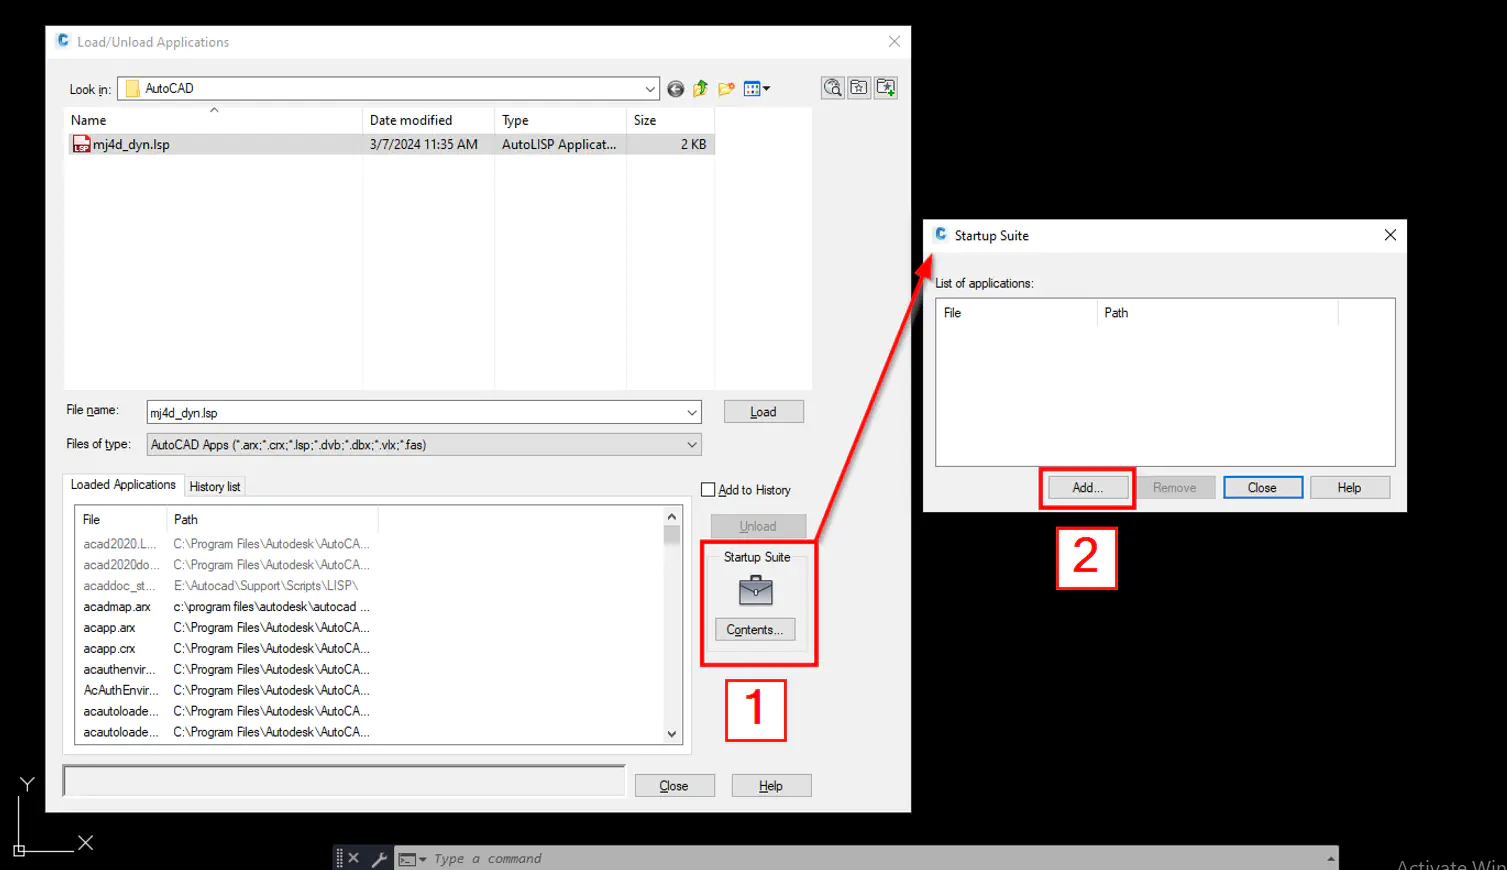
- Click Contents [1] under the Startup Suite text/icon and in the new window click Add [2].
- Navigate to the mj4d_dyn.lsp file that was downloaded from your project to add to the Startup Suite.
MicroStation V8i
To integrate MJ4D with MicroStation V8i use the mj4dV8i_dyn.mvba file downloaded from your project.
In MicroStation V8i:
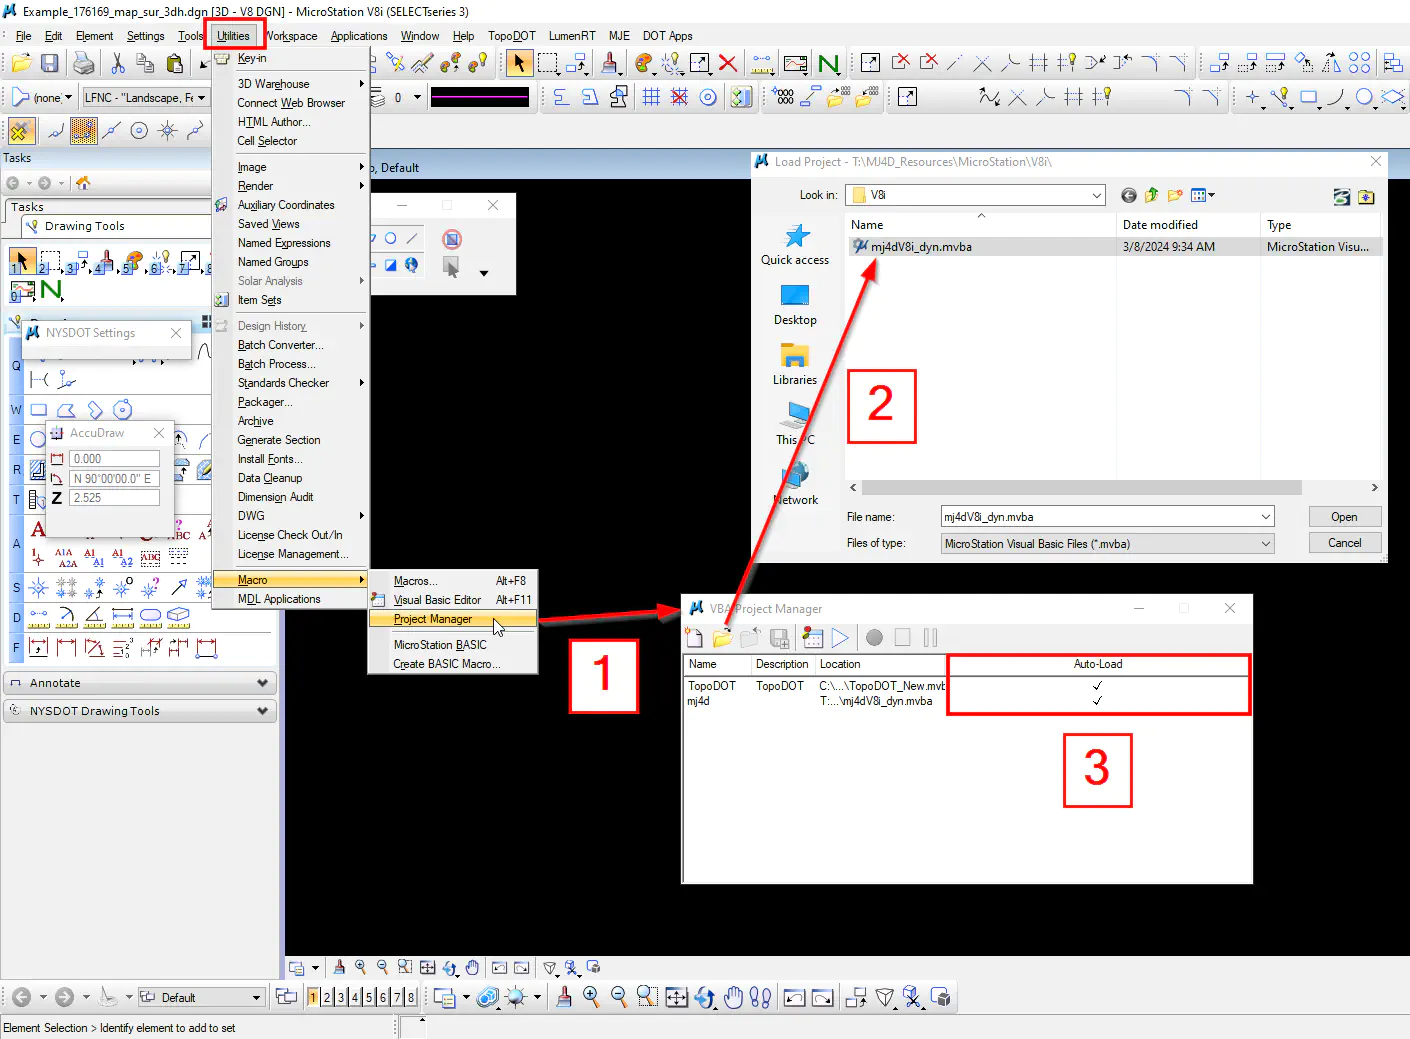
Navigate to Utilities -> Macro -> Project Manager to open the VBA Project Manager dialog window [1].
In VBA Project Manager, click the folder icon to open the Load Project dialog window and then navigate to the mj4dV8i_dyn.mvba file that was downloaded from your project and click Open [2].
Check the Auto-Load box next to the loaded mj4dV8i_dyn.mvba file to have the MJ4D project automatically load into MicroStation V8i when opening the associated .DGN file in the future [3].
Note: the mj4d_config.txt file from the integrations download needs to be in the same folder as the .DGN file being used in MicroStation V8i.
- With the mj4dV8i_dyn.mvba loaded, you can now use the MJ4D tool in your drawing.
To use via a Key In command:
- Press
Enterto open the Key In dialog window. - In Key In, type and run the command
vba run [mj4d] Mainto activate the MJ4D tool (the command will be saved so next time it will not need to be typed again).
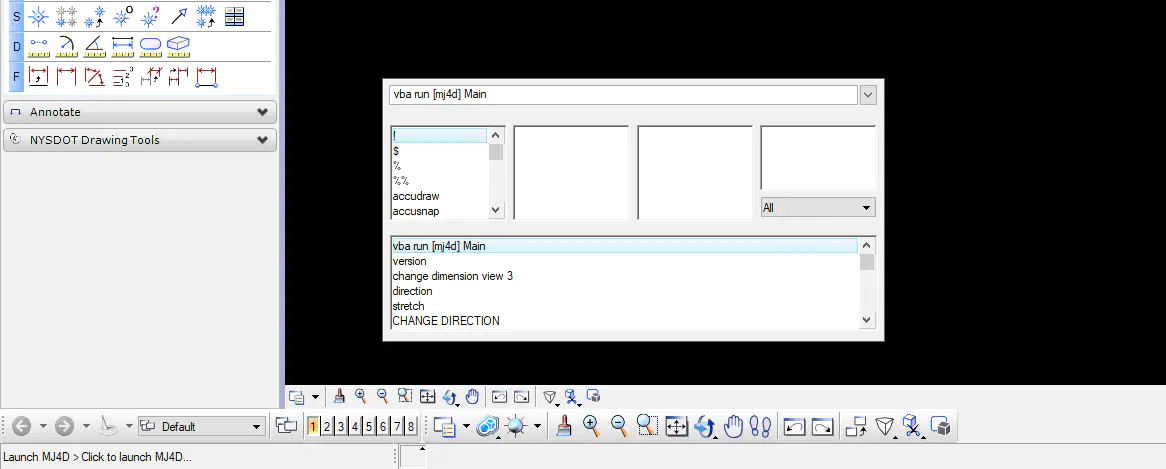
- Confirm that the tool is active in the bottom left of the MicroStation V8i window then click a location in your drawing.

- The MJ4D project will launch in your default browser at the panoramic photo location closest to where you clicked.
Assign the MJ4D tool to one of your Function Keys for quicker access:
- Navigate to Workspace -> Function Keys.

- In Function Keys, click on a key such as F8 and in the action command type
vba run [mj4d] Main, as shown in the example image below. Then click Save to close the dialog window.
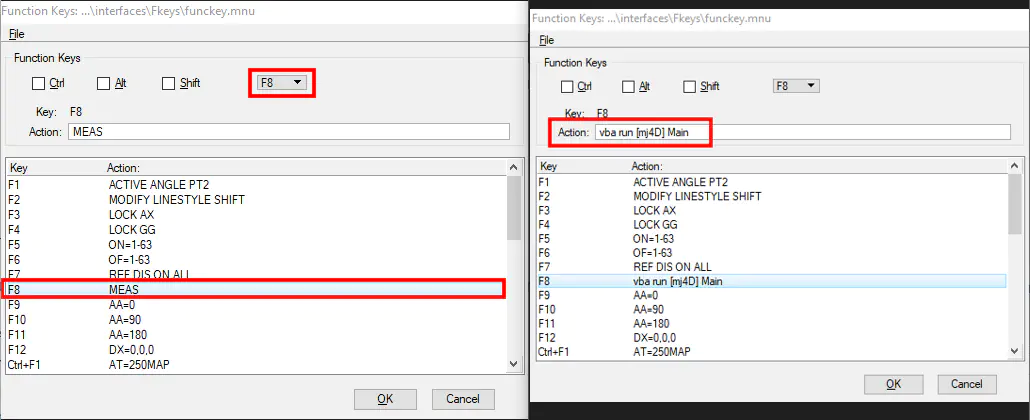
- Lastly, navigate to File -> Save Settings to save your key assignment to your preferences.
MicroStation Connect
To integrate MJ4D with MicroStation Connect use the mj4dConnect_dyn.mvba file downloaded from your project.
In MicroStation Connect:
Navigate to Utilities -> VBA Manager in the ribbon to open the VBA Projects window.
In VBA Projects, click the folder icon to open the Macros dialog window [1] and then navigate to the mj4dConnect_dyn.mvba file that was downloaded from your project [2]. Click Open.
Note: the mj4d_config.txt file from the integrations download needs to be in the same folder as the .DGN file being used in MicroStation Connect.
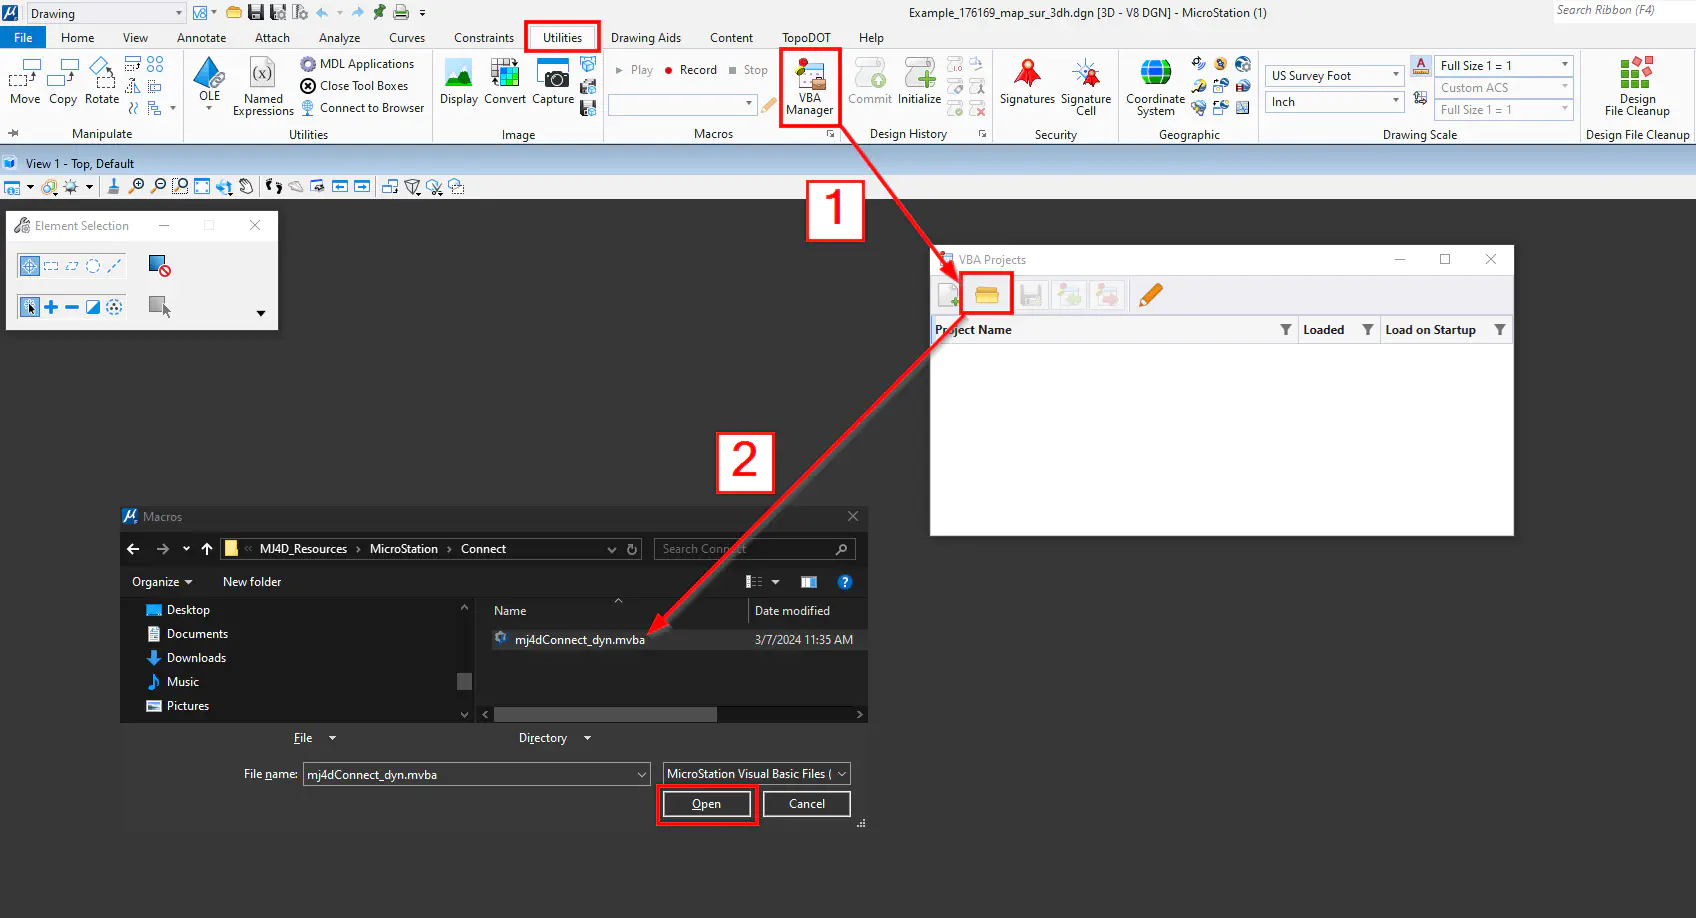
- With the mj4dConnect_dyn.mvba loaded, you can now use the MJ4D tool in your drawing.
To use via a Key In command:
- Either press
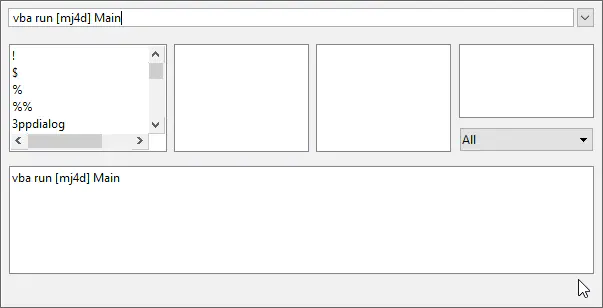
Enteror search “Key In” in the top right search bar to open the Key In dialog window. - In Key In, type and run the command
vba run [mj4d] Mainto activate the MJ4D tool (it will be saved so next time you do not need to type it again).
- Click a location in your drawing.
- The MJ4D project will launch in your default web browser at the panoramic photo location closest to where you clicked.
Assign the MJ4D tool to one of your Function Keys for quicker access:
- Navigate to File -> Settings -> User -> Function Keys.
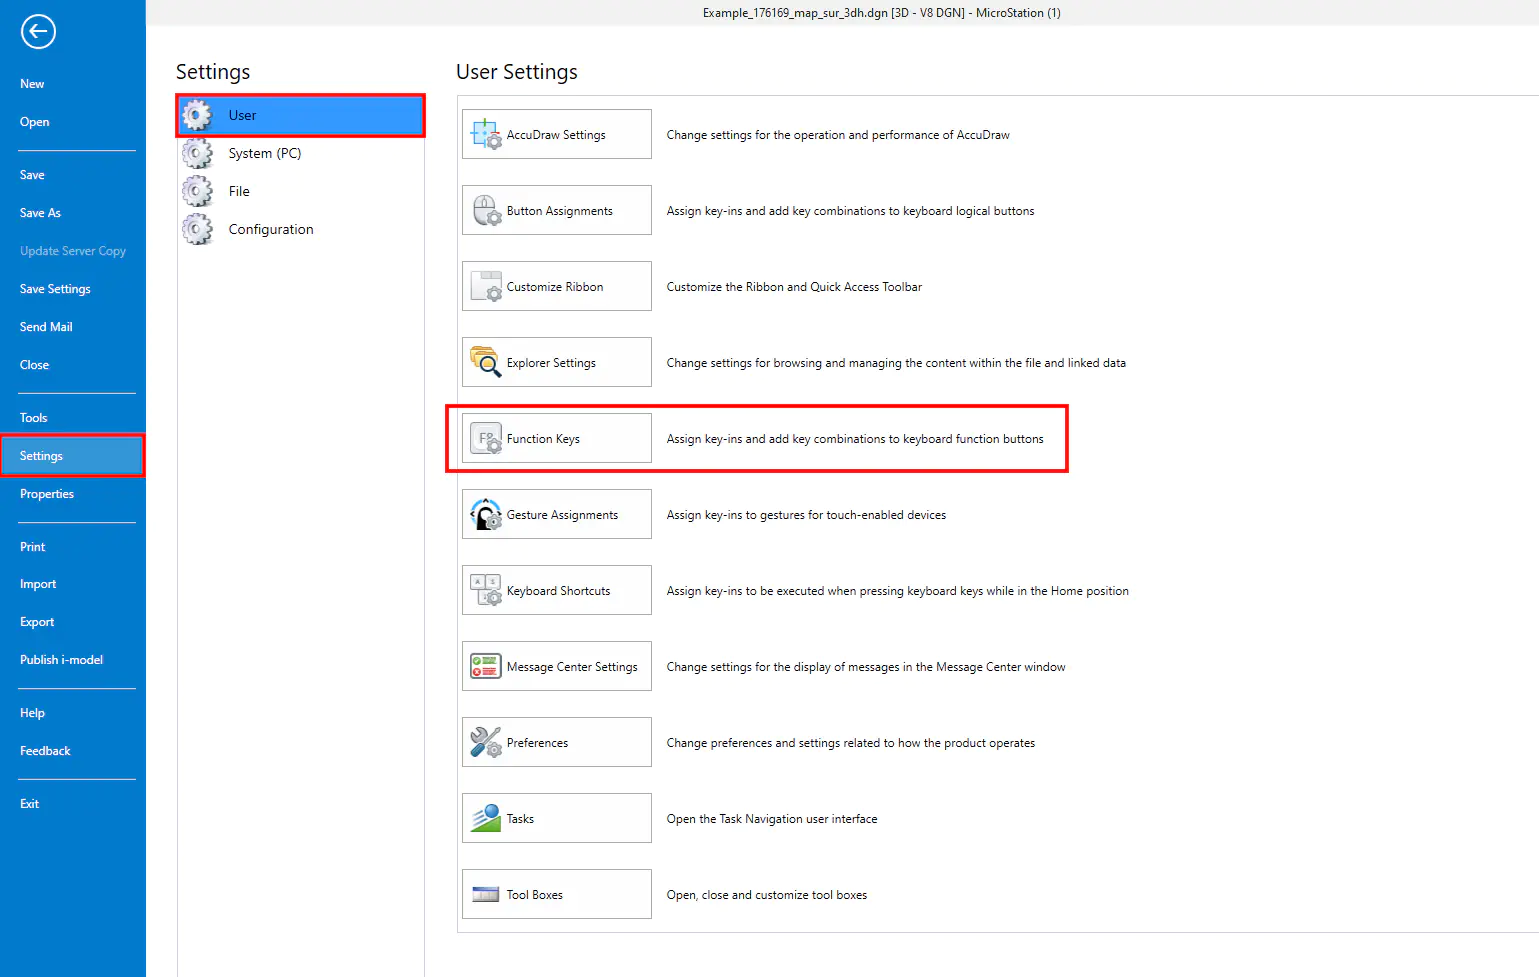
- In Function Keys, click on a key such as F8 and in the action command type
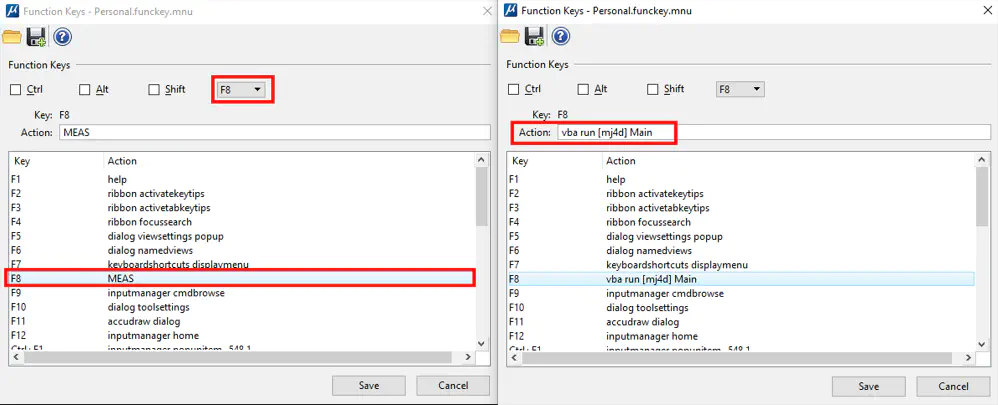
vba run [mj4d] Main, as shown in the example image below. Then click Save to close the dialog window. - In the left ribbon, click Save Settings to save your key assignment to your preferences.
ArcGIS Pro
Add the panoramic photo locations into ArcGIS Pro as a KML layer with the integrations.kml file downloaded from your project.
In ArcGIS Pro:
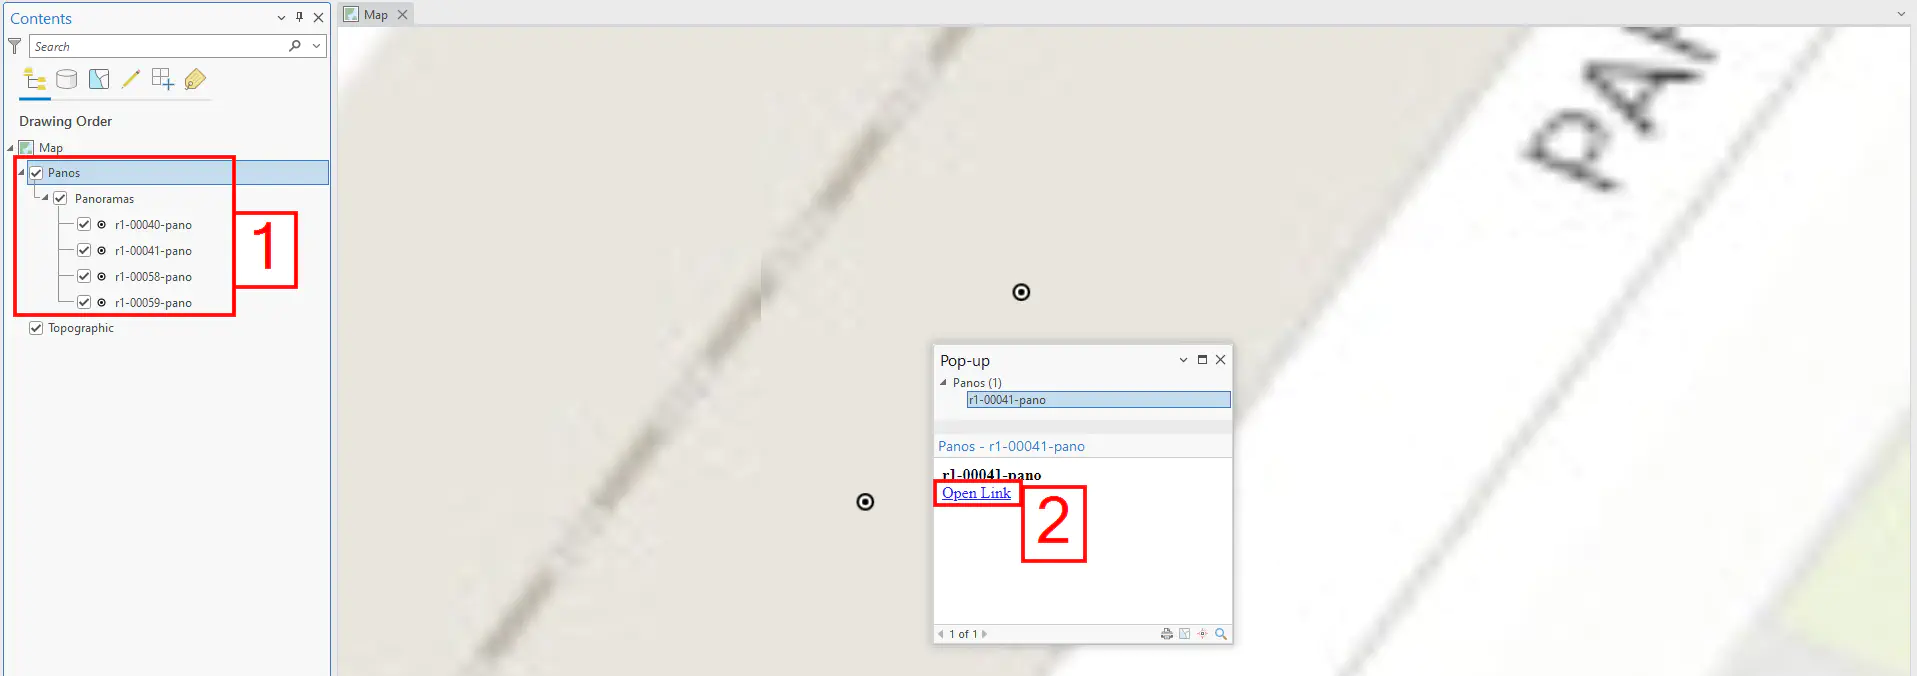
- Open the integrations.kml in your ArcGIS Pro project either by dragging and dropping the file from your file explorer into ArcGIS Pro or going to Map -> Add Data then in the Add Data window navigate to the integrations.kml file that was downloaded from your project, and click OK.
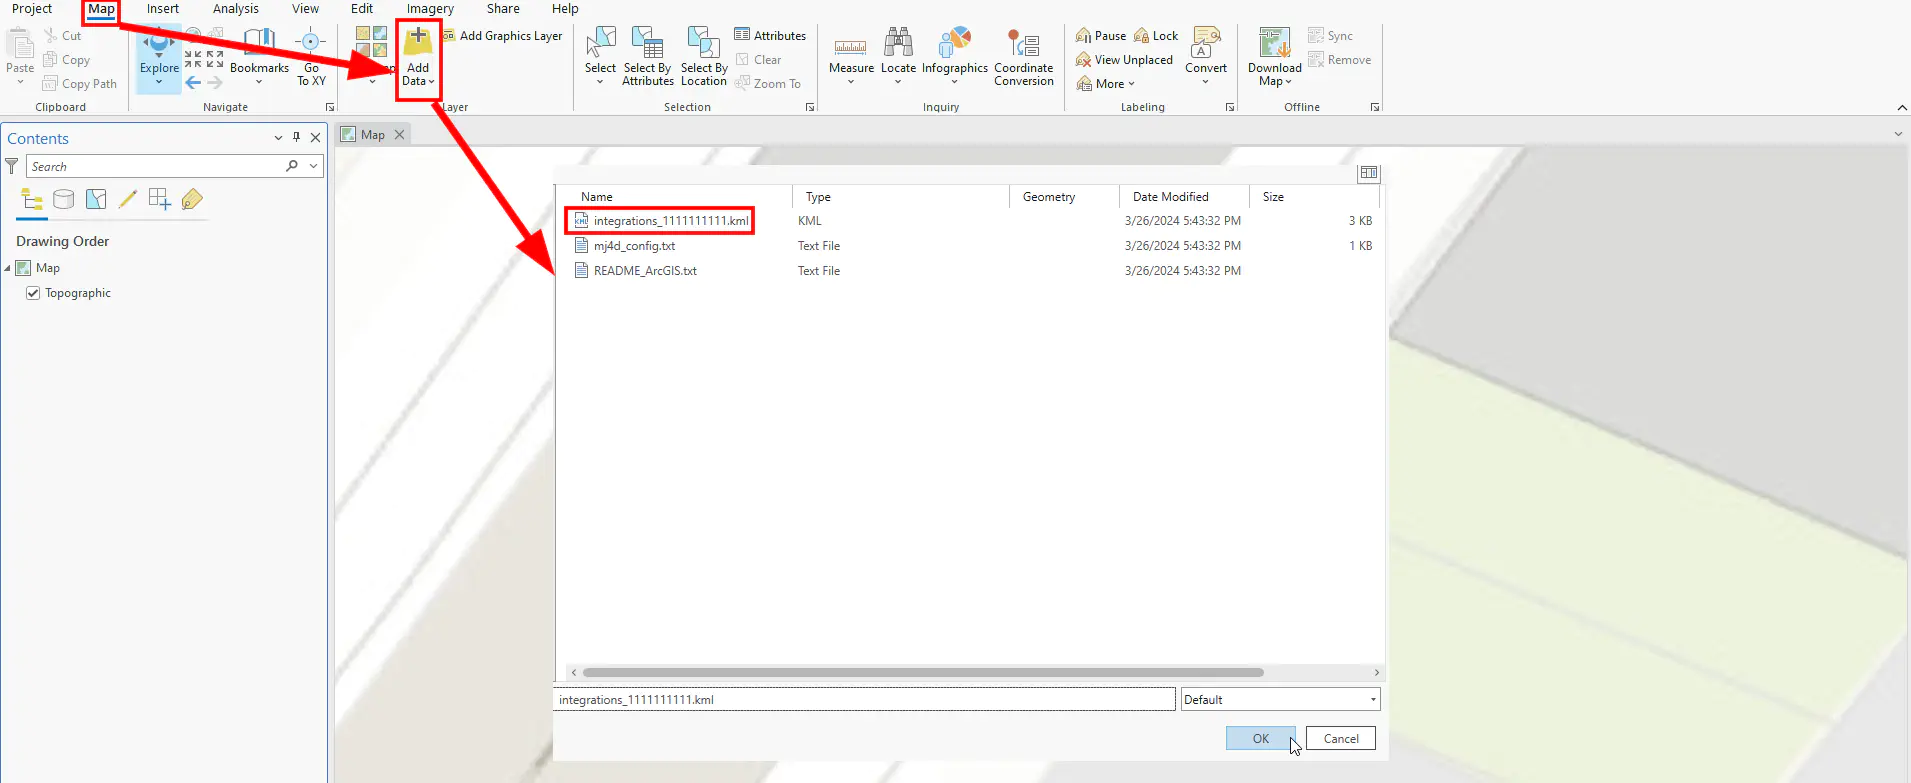
The panoramic photo locations from your MJ4D project will appear as a KML layer in ArcGIS Pro [1].
Using the Explore tool, click on a panoramic photo location point and in the Pop-up window click Open Link to open your MJ4D project in your default web browser at the panoramic photo location closest to where you clicked [2].
Google Earth Pro
Add the panoramic photo locations into Google Earth as a KML layer with the integrations.kml file downloaded from your project.
In Google Earth:
- Open the integrations.kml in your Google Earth Pro project by either dragging and dropping the file from your file explorer into Google Earth Pro or going to File -> Open then in the window navigate to the integrations.kml file that was downloaded from your project and click Open.
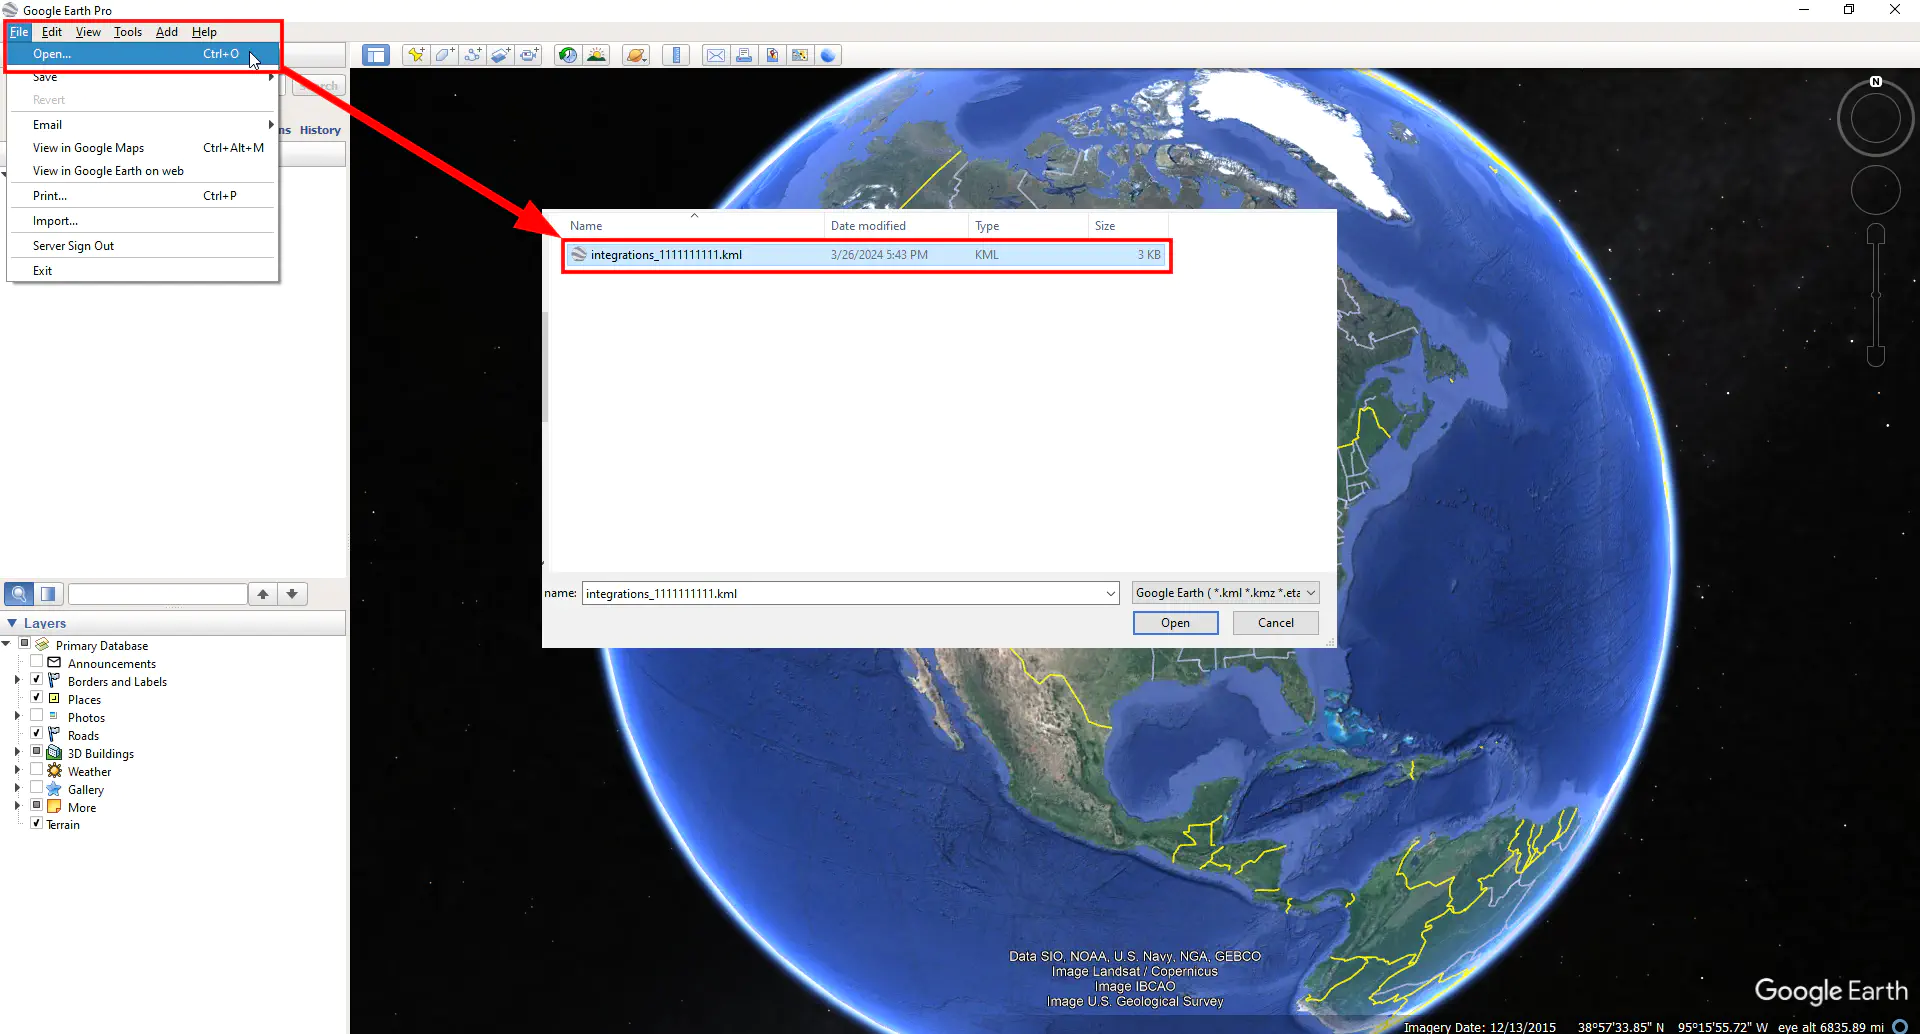
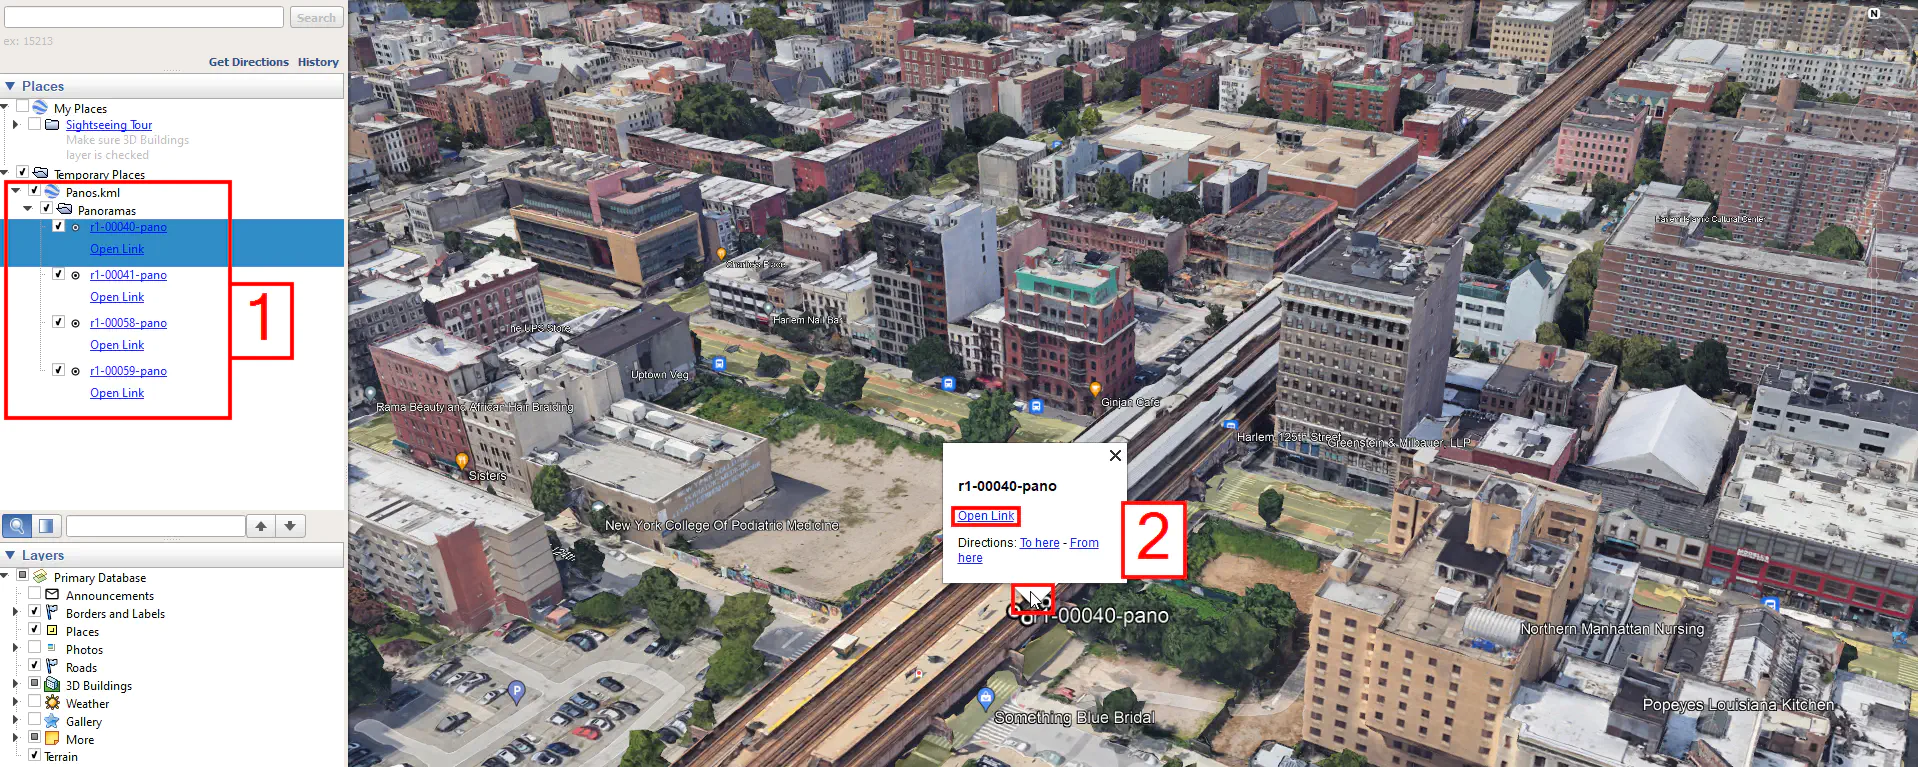
The panoramic photo locations from your MJ4D project will appear as a KML layer in Google Earth Pro [1].
With the cursor, click on a panoramic photo location point and in the Pop-up window click Open Link, then on the next window click Open In your default web browser to open your MJ4D project at the panoramic photo location closest to where you clicked [2].
