PinPoint
This feature reference page provides an explanation for each button that exists in the pinpoint menu. For more information about specific workflows including managing PinPoints, editing PinPoints and managing the PinPoint window menu see the PinPoint Workflows Page
PinPoint Dropdown
To get started with PinPoint select the PinPoint tool in the Panoramic Photo Pane navbar:
![]()
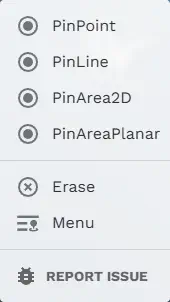
When clicking on the PinPoint tool in the panoramic photo pane navbar, a dropdown menu will appear:

Each of the dropdown options performs a certain task, outlined below:
PinPoint
Once clicked, the PinPoint Menu will appear on the screen and Illuminate Mode will be temporarily enabled in the panoramic photo pane. There is a sliding bar at the bottom of the photo pane to adjust the opacity of the intensity imagery over the panoramic image, identical to the bahavior of Illuminate Mode when enabled via the toolbar button. The intensity imagery will be overlayed on the panoramic photo pane for the duration that PinPoint is activated. Once on this screen, pinpoints can now be placed.
PinLine
PinLine acts like a PinPoint except that it is represented by a multi-point line geometry. PinLines can have any number of vertices and planes. Each vertex can be edited by right clicking a vertex of the PinLine and moving it to a new location.
PinArea2D
PinArea2D acts like a PinPoint except that it is represented by an area. This area lies on the XY plane at the elevation defined by the first clicked vertex. Once that first point is placed, all subsequent verticies are contrained to this plane. Each vertex can be edited by right clicking a vertex of the PinArea2D and moving it to a new location. This type of area is best for defining areas on flat surfaces (such as a flat roof or ground).
PinAreaPlanar
PinAreaPlanar acts like a PinPoint except that it is represented by an area. This area lies on the plane as defined by the first three verticies. The first three verticies of this area can be selected anywhere in space, then subsequent verticies will be constrained to the plane defined by the first three verticies. Each vertex can be edited by right clicking a vertex of the PinAreaPlanar and moving it to a new location. This type of area is best for sloped or vertical surfaces (such as the ground of a hill or the side of a building).
Erase
To erase existing pinpoints, click on the Erase tool. Once the tool is elected the cursor becomes an icon. To delete any pinpoint simply click on the marker. To exit the Erase tool, right-click anywhere on the screen.
Important Note: Any pinpoint that is clicked while this tool is active will be immediately deleted and cannot be recovered.
Menu
Clicking this option opens the PinPoint Menu:

Note: this is the PinPoint Menu appearance with no placed pinpoints
The menu has three tabs:
Attributes - The Attributes tab contains the form to fill out when placing pinpoints. Once a pinpoint is placed and selected this tab displays all associated data for the selected pinpoint.
Table - The Table tab displays all placed pinpoints and their associated data, categorized by point type.
Help - The Help tab has quick tips on getting started with PinPoint, along with a link to this help page.
For more information on how to use the PinPoint menu check out the PinPoint Workflows Page
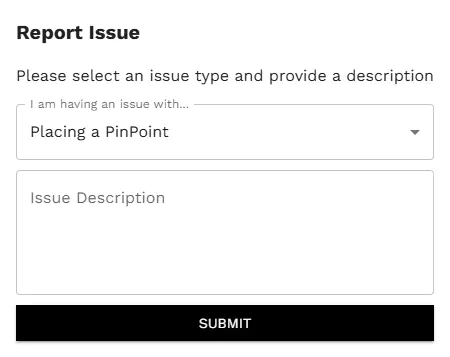
Report Issue
Selecting Report Issue will open up a form that can be used to submit a bug report to us if you are experiencing issues with the PinPoint feature.
